To produce an ‘Events Calendar’ the Webmaster has devised a relatively straightforward Post and Calendar page structure, with the addition of two plugins and some additional php functions to manage the posts and lists (on the Calendar page and and excerpt on the Home page).
The principles of the method are as follows:
- The User will enter each event as an Events post. Duplicating and modifying an existing Post is fine, as it will save having to change the Settings each time.
- Users must follow the instructions in the Events posts template for adding the Date and Venue as the first line in the Post. Important if it is to appear in the Home page short list.
- After adding any new Event/post, the User will be able to ‘reorder’ the Events posts list so that they are in chronological order
- The correct order will then be automatically presented on the Events (calendar) page.
- By using Keywords, the User can also determine which Events appear in the short list on the Home page.
- By setting Future actions for any post it can be removed from the list (by turning it back into a ‘Draft’ (not deleting it). A date and a time (i.e. when the event has finished) can be set at any time (pre and post Publication).
The Webmaster has built this system to be relatively simple and enable Users to design their posts just as with other post types, following the house style of the site.
Checklist
Below are the steps for adding and managing Events posts.
- All posts must use the ‘Events posts’ template
- All posts must be assigned to the ‘Events’ category
- All posts must be ‘closed’
- All posts should have a date tag inserted in them (the short date when the event takes place) this will assist Users in the next steps)
- Getting the Posts in chronological order. This is a simple drag and drop process:
- Once the post is Published, open the All posts list again and Filter it to see only Events posts.
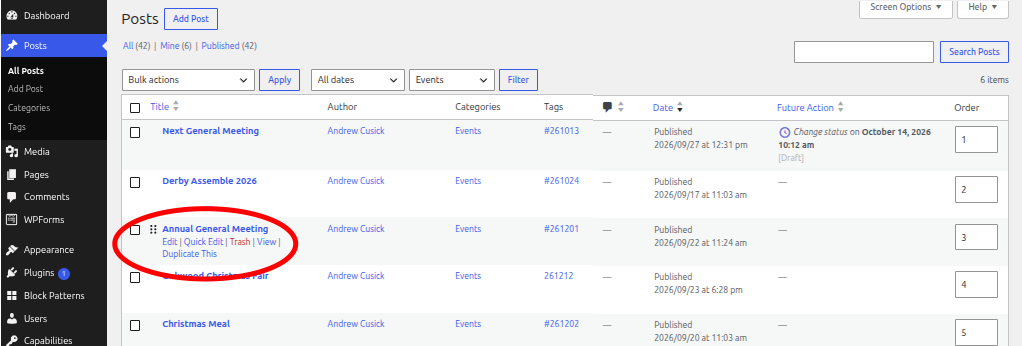
- Now when you hover your mouse pointer over a post title, you will see a small ‘grid’ of dots to the left of the Title and your mouse pointer changes to a hand. This means you can ‘drag’ and drop the post anywhere in the list to reorder it. See screenshot below.
- Your new post will now appear in the Calendar page in the correct chronological place.
- The date Tags entered into events posts will also help you arrange the list order (see the Tags column in the screen shot below)
Setting Future Actions
Ideally posts should be set to ‘expire’ once the Event has passed. This ensures they are removed from the Home page short list at least, should they appear on there (see below).
This can be achieved using the Future actions plugin as follows:
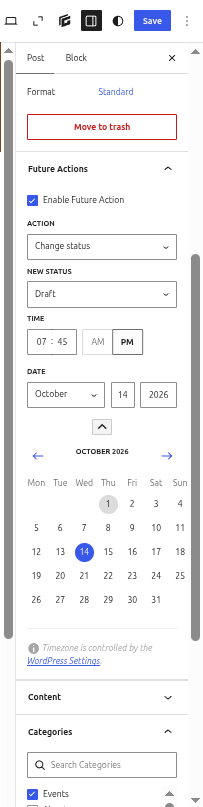
- The Future Actions settings are enabled just above the Category section in the Settings panel (see screenshot)
- Open the settings by clicking on the down arrow next to Future Actions.
- You will be presented with Action, New Status Time and Date sections.
- The first two are set correctly by default (Change Status to Draft).
- Just change the Date and Time to suit (you can use the Calendar as well). Ideally it should be after the Event has happened.
- Save the Post and Publish to set.
- You should see the action flagged in the Future Actions column in the All posts screen (shown in the first screenshot).
Setting an Event to appear on the Home page
This is controlled by using a keyword in a hidden block at the end of the post Content, as follows:
- The four keywords are eventone, eventtwo, eventthree and eventfour
- Depending on where you want the event in the short list, you should add the appropriate keyword
- Adding a keyword to a new post will automatically place it in the list, displacing the existing post, so no additional editing will be required.
- Ad the keyword as a Paragraph block and to hide it, in the List view on the left of the WordPress workspace, select the Paragraph block containing the Keyword, then click on the three dots on the right hand end of the block.
- In the drop down list, ‘Hide block’ is near the bottom. Check the Setting is ‘Hide Block from Everyone’, Save and Publish.
- As mentioned, ‘expired’ posts are not deleted, but changed back to ‘Drafts’. To return them to the list (for future reference, they can be ‘republished’ and no Future Action set – remember to remove any keyword if necessary, so that they don’t reappear in the Home page list!